
You’ve just subscribed to a newsletter that you’re excited about and don’t want to miss any emails. What can you do? That’s where whitelisting comes in.
A whitelist is a list of email addresses that you can create. Placing an email address on a whitelist tells the computer that you want to receive emails from those email addresses. Think of the whitelist as being the opposite of a blacklist where people are being excluded. Whitelisting an email address gives it a “green light” on your computer or smartphone.
The instructions for whitelisting an email address vary depending on the type of email software you’re using. We’ve listed the most common email software below.
Apple iPhone
In your email program, select the email that is from the email address you want to whitelist. Click on the person’s name. You’ll get a new screen that gives you a choice to Create New Contact. Click that, then click Done. The contact is now added to your Address Book.
Gmail or G-Suite
There are two steps you can take to whitelist an email address in Gmail. One way is to click on an existing email and click the drop down arrow next to the Reply button on the right side of the email body. You’ll see the choice “Add ___ to Contacts list.” Choosing this will add the person and email address to your Contacts and Gmail typically delivers those emails to your inbox.

If that doesn’t work, you can also go into Settings by clicking the gear icon at the top right and selecting Settings from the drop-down menu. Choose the Filters and Blocked Addresses tab. Click on Create a New Filter.

Enter the email address in the From field and click the link at the bottom right labeled “Create filter with this search.”

Check the box next to “Never send it to Spam.” You also have the option to Star the message, mark it as important, move it to another folder, and more. Click the Create Filter button.
Outlook
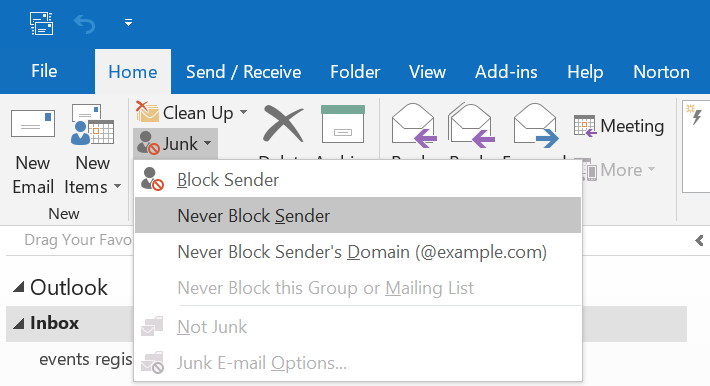
There are many versions of Outlook, and the instructions are similar in all versions. Locate the email message and select it. From the menu, locate the Junk icon and click the arrow to the right. The drop down menu will include “Never Block Sender;” select it. You can also choose “Never Block Sender’s Domain.”
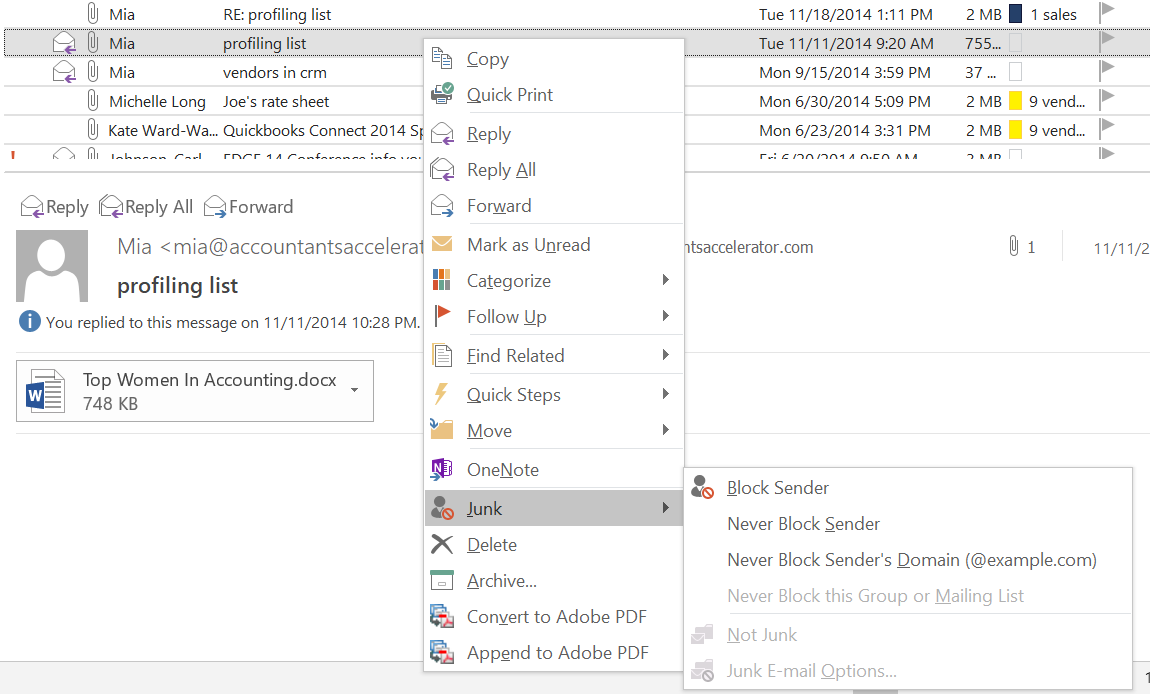
A similar way to whitelist an email address is to select the email message and right click. Mouse over the Junk option in the drop down and click “Never Block Sender” or “Never Block Sender’s Domain.”
Other Email Apps
If you don’t use the three most common solutions above, you can find other instructions for Android, Yahoo!, AOL, and others on this page: https://help.aweber.com/hc/en-us/articles/204029246


